Bone Boot Camp Day 1- May 11, 2015
Our instructor, Dr. Barrett, shared his class expectations before he showed us the Youtube video clip, “The Secret of the Desert Mummies – The Chiribaya,” featuring our future host, Dr. Sonia Guillén. Afterwards, we received an overview of the bones. We learned how to set up our skeletons in Standard Anatomical Position (SAP) before we collect data. Setting a skeleton in SAP means the skeleton is arranged as if it is lying on its back, palms facing up. We also learned terms to help us orient the bones when setting them out and talking about them. Dr. Barrett then had us take a box filled with bones and place the skeleton in SAP using our textbooks, “The Human Bone Manual” and the “Standards For Data Collection from Human Skeletal Remains” as our reference, which took the rest of class to complete.
Bone Boot Camp Day 2- May 12, 2015
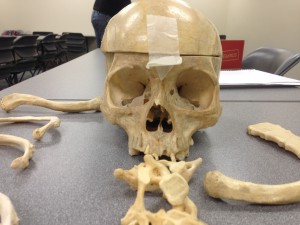
This is an anterior view of the skull of one of the skeletons we put together in class. These bones are real.
Our day stated with another skeleton we arranged into SAP. Dr. Barrett introduced us to the skull, which we would be taking measurements of for our data collection. After the lecture, Dr. Barrett had us take a new box of bones to set up in SAP and then fill out the first few pages of the Standards we would be filling out down in Peru. The first two pages were coloring the bones present. Afterwards, we took inventory, which was a simple range of numbers. If the bones are absent, the space is blank. If they are there and good condition, they are given a 1. A 2 means that between 25-75% of partial bones are present, and a 3 means less than 25% of the bone was present, meaning poor condition. After we finished the inventory, we took measurements of the skull, which kept us busy for the rest of class.
Bone Boot Camp Day 3: May 13, 2015
Our day started with another skeleton we set out in SAP. We had our quiz on the skull, where we had to name 10 the bone or feature and where it can be seen using the terms we learned from our first day. Afterwards, we completed our skull measurements from the previous day. We then moved onto the long bones, vertebra, sternum, ribs and post-cranial measurements of the skeleton.
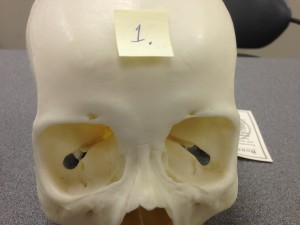
Point 1 on the skull labels the Frontal Bone which is viewed from the anterior (front) part of the skull.
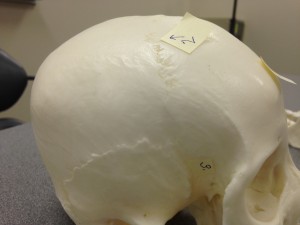
Point 2 labels the Coronal suture, which is seen on the lateral side of the skull. Beneath it is Point 3 which is the Sphenoid Bone, also seen in the lateral view of the skull.
We also began learning about post-cranial measurements, which are measurements of bones not related to the skull; we need to take 43 measurements in all.
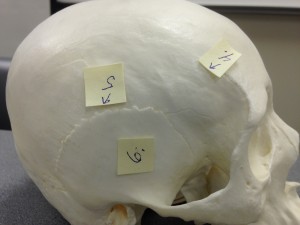
Point 4 points to the temporal line which is viewed from the lateral side of the skull. Point 5 is the squamosal suture that is also seen from the lateral side of the skull. Point 6 is the temporal bone that is viewed from the lateral side of the skull.
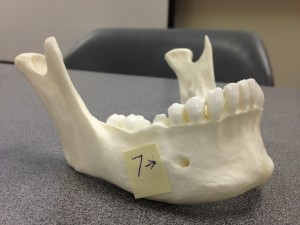
Point 7 points to the mental foramen which is where the blood vessel enters the skull’s jaw which is seen on the skull’s anterior (front) position but is inferior (below) the skull’s teeth.
An osteometric board is used to measure the long bones, in addition to calipers and a cloth tape measure.
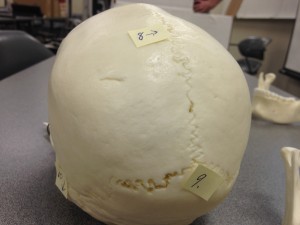
Point 8 points to the sagittal suture that separates the skull into right and left from the superior (top) view of the skull while Point 9 at the skull’s posterior (back) points to the occipital bone.
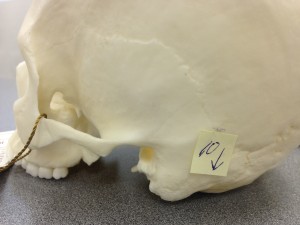
Point 10 is the mastoid process that is viewed from the skull’s lateral (furthest part from the middle) position.
Once our lecture concluded, we assembled another skeleton into SAP and filled out our Standards forms. The packet was slightly thicker as we also had to take measurements of the new bones we learned about in class. Just before class ended, we learned we received our itinerary from Dr. Guillén, which we would go over at our meeting with the radiology group the next day prior to class.
Bone Boot Camp Day 4: May 14, 2015
Prior to Bone Boot Camp, we met with the radiology instructors and their two students.
At this meeting, we went over the itinerary, going over the practicalities and asking
questions. After this meeting and a brief break, we launched into Bone Boot Camp
by taking our quiz regarding the bones we studied the previous day before we moved
onto the topic of the hand and foot bones. These bones are similarly organized, but
their terminology is different.
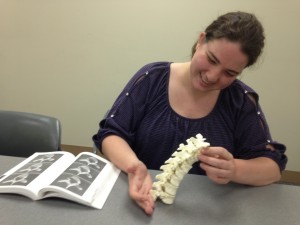
This is me, Erin Fedeson, with “The Human Bone Manual” open next to me as I apply one of the methods Dr. Barrett suggested: “try to fit the vertebra together like a puzzle” on Bone Boot Camp Day 3.
After the hand and foot bones’ talk, we learned how the bones can tell us the individual’s sex and age. What we were told is we simply document our observations as we cannot guess either the individual’s sex or age. One of the main places we look at for documenting the individual’s sex is the pelvis. For documenting the individual’s age, we use several methods. The most accurate of the methods is the auricular surface of the ilium because the individual’s sex is not a factor. Documenting both the individual’s sex and age took us to the end of class.
Bone Boot Camp Day 5- May 15, 2015
After our quiz on the foot and hand bones, we started our first day with teeth. An individual starts with deciduous teeth, which are 20 baby teeth. They are usually lost when an individual is around 5 to 6 1/2 years. The baby teeth are replaced by the 32 permanent teeth. These teeth are broken into four groups: incisors, canines, pre-molars and molars. “The Human Bone Manual” had pictures of the teeth we could use as a reference. Following our exercise was learning how to take the teeth’s inventory and note defects such as wears, caries, abscesses and calculus. Our class concluded with an inventory of a skull’s teeth with notes of defects.
